
Are you hampered by different types of errors when using QuickBooks Enterprise and are looking for an illustrative walkthrough to get those errors fixed? If yes, then you will find answers to all your questions related to the QuickBooks Desktop Enterprise Common Errors in this blog. All you need to do is sit back and go through this article all the way till the end.
The current article shall walk you through the various QuickBooks error like QuickBooks Error 3371, QB error code 15215, QuickBooks Error code 6177, and also familiarize you with the assorted approaches for fixing these errors. So, make sure to read this clear blog all the way through to get all these errors fixed out.
What causes the Most Common QuickBooks Enterprise Errors?
Although there are diversified factors that could contribute to common QuickBooks Enterprise errors, there are some common causes behind the various Enterprise errors. These causes include:
- Damage in the company files and the user trying to get access to the files.
- QuickBooks not updated to the recent version.
- Virus or malware may have infected the computer.
- The QuickBooks Installation files might be corrupted.
- A program in the background might be contributing to the errors.
- Windows Registry related errors could also provoke the various errors.
Steps to Fix Most Common QuickBooks Desktop Enterprise Errors
The various QB Enterprise errors and the solutions to troubleshoot them are listed below:
QuickBooks Error code 3371
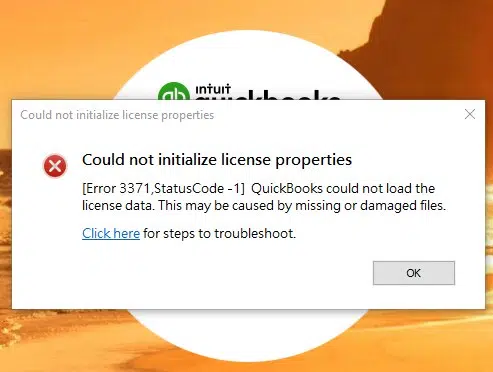
QuickBooks Error 3371 is generally associated with wrong license details related to QuickBooks. A potential approach to fixing this error requires the user to perform the following steps:
- In the beginning, users are required to tap on the Windows + R keys.
- The previous step will disclose the Run window, wherein, the user needs to type in
“Drive [C]:/ProgramData/Intuit/Entitlement Clientv8“.
- Following that, proceed by hitting on the ecml file and following that, delete the file.
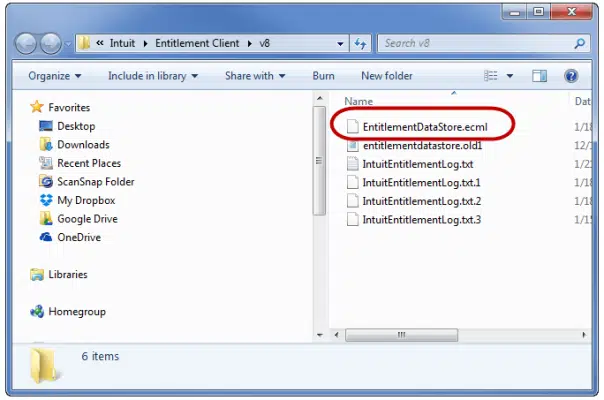
- The subsequent step requires restarting QuickBooks and registering the program. Upon a successful registration process, the user should again perform the same steps that led to Error code 3371 in QuickBooks to make sure that the error doesn’t become a source of botheration this time around.
QuickBooks Error H101 and Error H202
QB Error code belonging to the Hxxx series error are generally linked with the company file issues when accessing the same in the multi-user mode. This error is most commonly caused due to wrong internet settings within or outside QuickBooks. Getting the errors of this series fixed is easy. All you need to do is implement the fixes listed below:
Fix 1: Running QuickBooks File Doctor
- To avail this impressive troubleshooting tool, the user should first get QuickBooks Tool Hub downloaded from the Intuit website, and following that, Install the tool on the computer.
- Once done with the installation, the user is required to proceed with the launch of the Tool Hub.
- Subsequent to launching the tool, the next step requires hitting on the Company Issues tab.
- Follow up by hitting on the option for choosing the QuickBooks File Doctor tool.

- Now, the user should opt for the company file which was encountering QuickBooks Error H101, or Error H202 when running in the multi-user mode.
- Subsequent to opting for the file, the next step requires diagnosing the same for technical issues.
- Once the troubleshooting is complete, the next step that needs to be complied is to run QuickBooks as an admin and open the same company file in the multi user mode.
Fix 2: Configuring the host settings
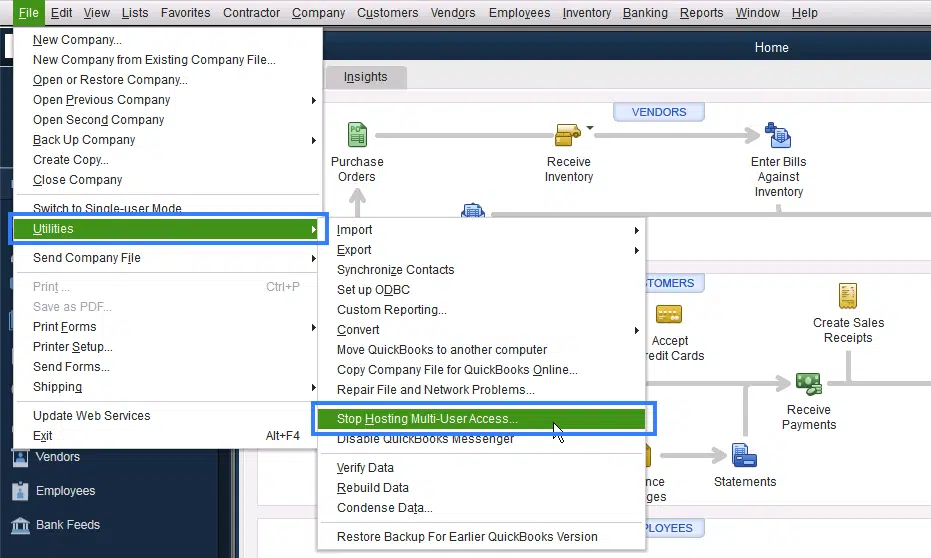
- This method first requires launching the QuickBooks program as an administrator. When the program launches successfully, the later step involves hitting on the File tab.
- Within the File tab, make a move to the Utilities tab.
- Herein, the user needs to click on the Multi-User Mode option.
- Subsequent to opting for the muti user mode option, the next step is to tap on the option to Stop hosting multi-user access option (if it is visible on the screen).
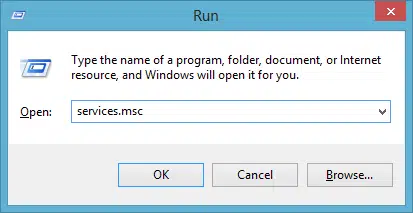
- Make an exit from QuickBooks and then hit on the Start button on the taskbar.
- From there, the user should type “Services.msc”, followed by clicking on the Services tab.
- Search for the QuickBooksDBXX service. If the same is not showing up, the user should get the same installed on the computer.
- The next step required launching QuickBooks as an admin and confirming whether the hosting has been turned on.
- Double-tap on the QuickBooksDBXX service and check its status.
- Proceed ahead by opting for the Recovery menu option.
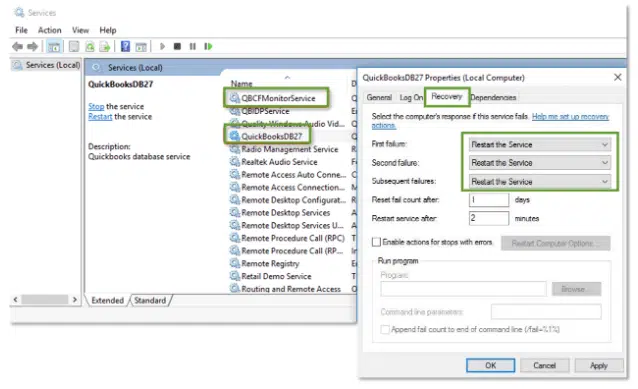
- After performing the previous step, attempt to view the company file in multi user mode.
QuickBooks Error code 15xxx
QB Error code 15xxx family of errors represents QuickBooks installation or QuickBooks update issues that are mostly linked with the damage or corruption of the installation files, Windows components, or insufficient permissions to commence with the update. The troubleshooting fixes are given below:
Fix 1: Using the admin account
- Before starting with the update process, the QuickBooks application should be started as an administrator.
- For this, start by right-clicking on the QuickBooks Desktop .exe icon and then follow up by choosing the option to Run as administrator.
- Now, the next step requires clicking on the Help menu and followed by tapping on the option to Update QuickBooks Desktop.

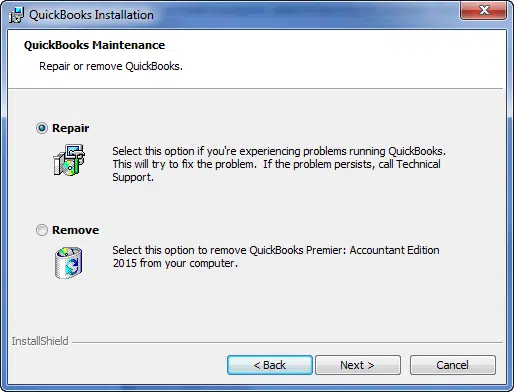
Fix 2: Repair QuickBooks
Certain recent changes in QuickBooks which provoked the installation errors in QuickBooks can be dealt with by repairing the accounting program. The same is possible by implementing certain steps given below:
- The inceptive step involves clicking on the Start button, followed by searching for “control panel”.
- Now, open the Control Panel and following that, proceed to the Programs and Features tab.
- This action will reveal a long list of programs that are installed in the system.
- Herein, the user should opt for QuickBooks from the list, and then right click on the same to tap on the Repair option.
- Once QuickBooks has repaired, proceed by running QuickBooks, and then proceeding with the update process again.
QuickBooks Error code 6177
This error code belongs to the category of Company file errors. These errors are generally caused due to a damaged company file. Below given solutions will guide users through the process of troubleshooting of QuickBooks error code 6177.
1st Solution: Using the QuickBooks File Doctor
- Users need to first go for the downloading and installing of the QuickBooks Tool Hub.
- After that, the next step requires opting for the Company issues tab within the QB Tool Hub.
- Follow up by clicking on the QuickBooks File Doctor tool.

- Subsequent step requires clicking on the Browse option and choosing the suspected Company file.
- Proceed by scanning the file for any technical issues. The File Doctor will diagnose the issue and immediately fix it. Just hit on the Repair Now tab to get the issues fixed. QuickBooks Error 6177 should also be fixed through the process.
2nd Solution: Creating a copy of the Company file in different location
Creation of a company file copy in on the Desktop or some other location other than the original folder has led to the resolution of Error code 6177 in QuickBooks. The steps for this are:
Start by opening the QuickBooks folder and then navigating to the company files.
- Thereafter, right-click on the company file with which Error 6177 shows up. Just hit on the Copy option and then click on the option to paste the file on the Desktop.
- The next step requires running QuickBooks Desktop as an admin and then proceeding to open the Company file through the program.
- However, the file should be accessed from the new location.
QuickBooks Error code 99001
QuickBooks Error 99001 is generally linked with the multiuser mode issues. The error message typically pops up whenever the user tries to open the company file in the multiuser mode. The extermination of this error requires the following solution:
1st Solution: Renaming the Network file
- Initially, open the QuickBooks folder and proceeding ahead, search for the Company files with .nd extension.
- The next step requires choosing the file and then right-clicking on the same to opt for Rename.
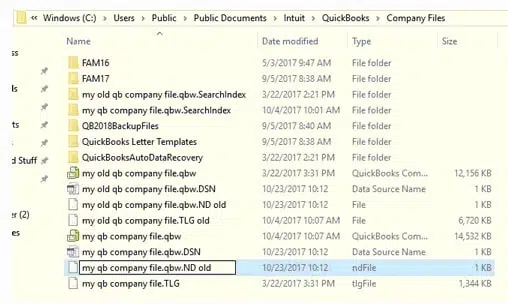
- Get the name of this file changed. The motive behind renaming the file is to make it inaccessible for QuickBooks to root out any chances of the error due to this error. Notably, a new .ND file shall be recreated upon opening QuickBooks.
2nd Solution: Run QuickBooks File Doctor Tool
- As mentioned in the steps discussed earlier in this article, the QuickBooks File Doctor Tool can be accessed via the QB Tools Hub program. This composite tool can also potentially fix the ongoing issue.
Conclusion
The list of errors encountered in QuickBooks Enterprise is unending. However, within the purview of this blog, we have earmarked the most common QuickBooks Enterprise Errors and the multiple strategies for fixing them. If you are facing any issue while performing the steps of troubleshooting, just give us a call at 1-800-761-1787 and our QuickBooks desktop error support experts will serve as a bone guard towards exterminating QuickBooks issues.


